Guides / Fencing Lasers
Fencing Lasers Australia – How To & FAQ’s
Align fences solo, over hills and at any range. How RedBack’s Auto Alignment lasers work, how to use them step by step, and the questions we get asked most.
Fencing isn’t easy – whether you are putting up ringlock, barbed wire, exclusion fencing, post and rail fencing etc. it’s a time-consuming job that’s tough on the body, no matter how many tools you’ve got to help.
For many years, there has been lots of innovation when it comes to the building of a fence, whether it’s augers, rammers, strainers or a bunch of other tools to make a fencing contractor’s life a little bit easier.
Unfortunately when it comes to fence alignment, one of the most important & underrated aspects of building a strong fence that will last – there have been very few solutions that actually help.
That is until now.
RedBack Lasers have developed a unique solution to solve this problem thanks to RedBack’s Auto Alignment feature of the EGL624GM & DGL1010GM Rotating Lasers.
Why it works
Benefits of RedBack’s Fencing Lasers
1-Person Alignment
These lasers are designed to allow farmers & fencing contractors to align fences independently – not everyone has the luxury of help when fencing!
From setup to the marking out of posts, everything can be done by 1-person. Pretty easily too.
Even if you have more than one person on site – one person can be lining up & marking out post positions while the other starts ramming them in, increasing efficiency.
In-Line or Offset operation
You have full flexibility with how this laser is set up, so you can tailor it to your workflow.
Some people like to put in each post as they mark them out – great. Use the laser at an offset to avoid breaking line of sight between laser & receiver.
Some contractors prefer marking all their posts out in one go. Offset is still usable here, but In-Line operation might be easier.
Hills & Gullys are easy
These lasers trace a complete 360° Line around the Laser – meaning you could be 400m above the laser in a helicopter and be able to detect it.
All you need is line of sight, so if you are clever & set your laser up in the right spot, you can easily mark out posts all the way up & down hills and gullys without issue.
This is a major benefit over alternative options like stringlines or sighter wires for instance.
Infinite Range
These lasers can go as far as you can! Designed to easily continue along a fenceline once the maximum range of the laser is exceeded.
Simply grab your laser & set it up over the last post marked/rammed in. You can even use your newly aligned fence as the reference to continue the straight line forward.
Easy 90° Squares
One thing lasers are good at is giving square – and these Fence Alignment Lasers are no exception.
This kit has the option of sighting your scope to an existing fenceline, while having the laser set up at 90° to it to create your new square fenceline.
Set your laser up however you want
Our alignment kits come fully fitted for every condition that you might face.
Got a deep gully where line of sight is impossible? Use the staff mounting bracket to raise the height of your receiver.
Want to mount your laser to the post? There’s a bracket for that. Rather use a tripod? Everything is ready to go.
Step by step
How to use a Fencing Laser to align a Fenceline?
What components are required?
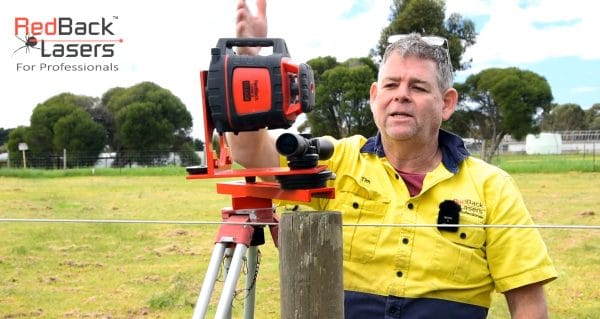
- A RedBack Rotary Laser with Vertical Align & Auto Alignment function (There are two main options, either the EGL624GM or the DGL1010GM – technically the Green624GM could also be used as it has the same functions, but the Green beam isn’t compatible with Machine Receivers so we probably wouldn’t recommend it.)
- FVAK64 Fence Alignment Bracket Kit to allow the laser to be easily mounted over the top of the Strainer Post
- Tripod & Staff Bundle (these aren’t 100% necessary – but do allow you to mount the laser easily over the top of a post, so are recommended and come as standard in our Fencing Lasers.)
Decide between “In-line” or “Offset” operation
To start with – you need to decide whether you want to have your laser aiming “in-line” with the fence, or if you’d prefer to set up at an offset.
Having your laser “in-line” means that both your scope & your laser level are mounted over the top of the desired fenceline, and your receiver will indicate the position of the posts when marking out your fenceline. This is a slightly easier set-up, but has the disadvantage of the laser potentially being shadowed/blocked if you want to ram in your posts as you go. The laser & receiver need line of sight to be able to give the position of the posts.
Alternatively you can set the laser up at an offset – where the Scope sits over the top of the fenceline, but the laser & receiver are both at an equal offset to one side of the fenceline. This eliminates the shadowing issue of running “in-line”. The receiver will be mounted on a bracket with a “scribe” on one side which sits in line with the fence, which is where you need to mark your posts when running at the offset.

Assemble the Fence Alignment Laser
Assembly of the Fencing Laser is relatively straightforward once you understand the difference between In-Line or Offset operation.
The Fencing Kit comes complete with a range of mounting options, allowing you flexibility in how you prefer to mount the alignment kit over the top of your post.
Some farmers & fencing contractors prefer to mount the laser directly onto the post using the post mounting bracket. Others will simply mount the sliding bracket to a tripod, and then attach the laser mount on top of that.
The kit comes complete with a Rotation Plate, allowing for easy fine adjustment of the whole bracket for precise alignment along the fence.
Align Laser Level to the Scope using Auto-Align/Auto Grade Tracking
This is the critical step – the reason why our Lasers will actually work for Fence Alignment! It’s very important that this step is done correctly.
First we need to have mounted the laser onto the Laser Bracket (make sure the handle is facing up/the sky!) – then simply turn the Laser on and allow it to auto-level.
To align the laser level to the scope – we simply pick a point within 50m (ideally in the 30m-50m range for best results) that we can sight through our scope to. NOTE this doesn’t have to be in-line with our fenceline, it can be off to one side. People often will use a mark on a tree, or put in a star post temporarily to use as a reference, but it can honestly be anything.
Once we’ve picked the point & sighted through our scope to it – then take your receiver over and put it on the same mark. If your laser has been set-up at an offset, then put the receiver so that the receiver bracket scribe is over the mark & the receiver is on the same side as the laser (both laser & receiver on the left hand side of mark, scope & scribe on the mark).
Then simply hold the “Channel” button on the receiver for ~5 seconds & a blue light on the receiver will appear & start flashing. The Laser is now “tracking” which means it is scanning from left to right, until it finds the location of the receiver. IMPORTANT be patient with the laser, sometimes it tracks within a minute, sometimes it can take 5+ minutes depending on how far it needs to scan to find the receiver.
When the Receiver detects the laser, the laser will do small adjustments until it eventually moves to the middle of the receiver. Sometimes when doing the small adjustments, it may bounce on & off the edge of the receiver, until eventually it moves to “0mm”.
Once the Receiver has detected the beam on 0mm for a few seconds – the blue light will turn off. The laser is now locked into the position of the receiver. You can now move the receiver and go back to your Fence Alignment Kit.
The Laser will now not move from this position, meaning that the scope & the laser are aiming in the same direction. Now if you use the rotation plate to move the alignment kit to line it up with your fenceline, your laser will still be aiming the same direction as the scope.
Aim scope at destination & use receiver to mark out posts
Now the easy part – simply aim the scope in the direction you want to fence towards. Once lined up, simply pace out the required distance (eg. 5m) to mark the position of your first post.
If you hold the receiver horizontally, it will detect the vertical line, and will actually tell you how many mm you need to move left or right to line it perfectly up with the middle of the laser beam.
Now mark or spray paint the ground once you are lined up with the laser line.
Rinse & repeat until you end up at your destination or until you lose range of the laser (~350-400m).
Exceeded the maximum range? Grab the Alignment Kit & set up over the last post to repeat Steps 3 & 4
Maximum Range for this laser unlike other Fencing Lasers is not an issue.
Simply grab the Laser Alignment Kit and put it over your last post (or its position if you haven’t rammed posts in yet!)
Then repeat Steps 3 & 4.
It’s that easy.
(You can put the laser into standby mode while moving it which will technically hold its alignment – but honestly for peace of mind & for how long it might take to do Step 3 – just do it. You’ll get better results.)
Questions answered
Frequently Asked Questions
What are Fencing Lasers?
Fencing Lasers are Laser Levels designed with the primary goal of Fence Alignment in mind.
RedBack Lasers have developed two Fencing Lasers that solve one of the hardest tasks of fencing – how do I build a straight fence?
Our Fencing Lasers consist of the following components; A Rotary Laser with Vertical Alignment & Auto Align, An Alignment Bracket & Scope Kit (the brackets of which are manufactured here in Australia) as well as a Tripod & Staff Bundle
Our EGL624GM & DGL1010GM Rotating Lasers come equipped with the Auto-Align function, which allows us to align the laser level to the scope – meaning that wherever you aim your scope at, your laser will also be aiming the exact same direction.
Now – lasers unfortunately can’t be seen visibly during daylight hours (no different to a torch or similar light), but they can be detected by a receiver allowing you to determine the position of the laser beam no matter the time of day.
Using the receiver you can easily mark out the position of the posts at consistent increments, which by the time you reach your destination will all be in one consistent straight line.
Why can’t I use any old Rotating Laser for Fence Alignment?
The challenge with using a normal Rotating Laser to trace a vertical line is there is no way to guarantee that the laser is aiming in the direction you are wanting it to go. When a Laser is set up on its side in Vertical Alignment mode, it will level itself automatically to trace a perfect vertical line.
Say you’ve got a strainer post off in the distance you want to fence towards, if you try and aim your laser in the direction of the post, you might get down there and use the receiver and realize it’s actually 6m to the left rather than hitting the post.
Some people will try and put their handheld receiver on top of the strainer post – and then move the laser left or right to align the two. But there’s no real way to tell if the laser is hitting the receiver or not, as the laser will constantly be relevelling whenever you move it. You’ll more than likely end up needing two people to align, one at the laser & one at the receiver/strainer post which defeats the whole purpose anyway.
Plus doing it this way will limit yourself to only being able to align within the maximum range of the laser (often 300-400m, condition depending).
What are some alternatives to Fencing Lasers?
Fence Alignment has been done a bunch of different ways over the years – and sadly there’s never been a prevailing method that really works from a speed, accuracy & consistency in all conditions point of view.
Some contractors will try and use stringlines – which are great until there’s a breeze or until you have to go up or down an incline/hill.
Some fencers use sighter wires, a plain wire strained between their two strainer posts. This is definitely less wind-affected than stringlines but takes a fair bit more initial set-up, and is a bit more awkward when it comes to actually putting the posts into the ground when you get to that stage.
Another way to do it is to use a scope & have one person looking from their starting post to their destination post, whilst another person moves left to right/right to left to line up with the scope. This works as long as you’ve got 2 blokes ready to go – but from all reports it’s getting harder and harder to get workers to come help.
There are 1 or 2 other Fencing Lasers available in Australia – the ones that are available are more expensive and honestly have less flexibility in how you can operate them.
The Fencing Lasers that RedBack Lasers have to offer allow you to use the lasers as standard rotating lasers, for shed pads, drainage, grading & more – unlike the others out there that are only for fencing. People often will use our Rotating Fencing Lasers horizontally to get consistent heights on all of their posts (or rails for horse fencing) after aligning the fence. Our Lasers can also be set up at an offset to the fence, or at 90 degrees to an existing fence for even more versatility.
What are Fencing Lasers suitable for?
RedBack Lasers’ Fencing Alignment Lasers have been developed with long range rural fencing in mind – but they are also suitable for commercial fencing, fencing for houseblocks etc.
As mentioned above, these lasers aren’t only for Fencing. They are two of our best Rotating Lasers for horizontal levelling & slopes for drainage so are a truly multi-purpose tool – unlike many of the other lasers sold for Fencing.
Need to get your laser checked before the next big job?
Precision is key. Book your laser in for Calibration & Service today.
Want to know more?
We’re here to help. Speak to a Laser Specialist.